Wednesday, February 29, 2012

Branching out

 It's really late on Wednesday night and I am finally getting around to posting!!! I really can't figure out where the day goes, or for that matter what I am doing with my time. All that aside, I have been so excited to post this week and show you what I have been working on. I have been so eager to work on my little girl's room since she has been born so I have been surfing the web looking for some ideas. I found some great ideas on pinterest that I just LOVED and had to try. Therefore, I cannot take complete credit for the idea...but I tried to put my own spin on it. I just want to say that I was really nervous of painting a BIG tree on the wall. I was reminded that if I didn't like it we could just paint over it and start new. Keeping this in mind I became a little bit more daring and I went for it. I ended up painting a white tree, I know that trees are not typically white, but I wanted it to be subtle and keep the nursery bright. So here are some pictures of it.
Being artistically challenged I had my husband draw the tree on the all for me, and then I completed it by outlining it and filling it in with paint white paint. I am in love with how it turned out and glad that I took the chance.
This next picture is a close up of the frames - collected from different garage sales/flea markets through the years just waiting for the chance to be used again. I painted the frames and filled them with the letters in her name. Each letter has a flower as the backdrop. Photography is another hobby of mine so I incorporated my own picture of flowers in the frames. They are hanging on the wall with pretty, pink ribbon by hooks to look like they are hanging from the tree branch.  I am excited about how it turned out. I just hope the little one enjoys it as much as I do someday. Have a great night!!
Jessica
Linked To:

Pin It
Pin It!

Monday, February 27, 2012

Updated Lamp

Happy Monday!  We had a good weekend!  How about you?  I can hardly believe we are headed into March.....makes me giddy with excitement!  I am SO looking forward to spring and seeing green grass and doing some gardening.  I recently redid a lamp TWICE...  My first attempt at updating this lamp was to spray the base black and update the lampshade.  The original lamp was a combination of brass and a shade of maroon....which I don't have a picture to show you.  Needless to say it was UGLY...and very outdated.  The lampshade was pure GROSS.  Here's the updated black lamp with a new lampshade.
However, I just wasn't sold on this look.  I don't know if the shocking white lampshade was too much for the black base or what exactly it was....I just didn't like the look of it.  So, I brushed a soft shade of pink on the base.  I love the new look and I think the lampshade compliments nicely with the base.  Here's the second updated edition.
Enjoy your day....  Thanks for reading.

Participating in these parties:
http://pinkapotamus.blogspot.com/,http://youaretalkingtoomuch.blogspot.com,http://diyhshp.blogspot.com,http://itssoverycheri.com,http://www.madincrafts.com/,http://craftskeepmesane.blogspot.com/,http://www.skiptomylou.org,http://booghttp://www.sugarbeecrafts.com/ieboardcottage.blogspot.com/,http://www.creatingreallyawesomefreethings.com/,http://diyshowoff.com,http://sumossweetstuff.blogspot.com/,http://www.notjustahousewife.net/,http://abowlfulloflemons.blogspot.com/,http://projectqueen.org/,http://imtopsyturvy.com/,http://gigglesglitzandglam.blogspot.com/,http://www.sugarbeecrafts.com/,http://typeadecorating.blogspot.com,http://bec4-http://somedaycrafts.blogspot.com/,beyondthepicketfence.blogspot.com/,http://www.houseofhepworths.com,http://www.733blog.com/,http://somedaycrafts.blogspot.com/
Pin It!

Saturday, February 25, 2012

A New Table Cover

Happy Saturday!  I hope you all are being productive;)  I honestly can't tell you where the week went and what exactly I did, but somehow it is Saturday!!  So my little card table, I think that is what it is called.


So I painted it red awhile ago, and I still like that.  A little pop of color right?  I just tried out the good old modge podge on the top.  I tried and I failed, and I tried again, well that is what is left of it on the top.  I don't really know what the secret is....so if anyone knows let me in on the secret.  I am thinking that I used too thick of paper, but anyway I gave up.  So I did what I could handle.


I sewed burlap and muslin together, and a little table cover emerged.  All I did was cut the square of burlap to cover the table and pinned the muslin so it ruffled a little bit and sewed it together.  I hemmed the muslin, but I feel as if you wouldn't even have to, sometimes the rough edges are really cute too.


So please just excuse the couple of dinosaurs and toys in the picture.  It's where the natural light was the best.  In all the rooms, it's got to be the toy room.:)
Have a great weekend...until next time...Kim

Linked to:

Pin It!

Friday, February 24, 2012

A new use for an old refrigerator

Well it's Friday today and I bet that most of you are happy to be done with another work week. Since the little one has come into my life I feel like the days are kind of blurring together. I am still happy that it is Friday though!! The project that I am going to show today is from a piece that my mother-in-law decided to pass along to me. It was sitting in her garage and collecting dust. I like to think that I rescued it from being thrown into the garbage by my father-in-law. It was such a unique piece that I was drawn to it right away. The story behind it is the fun part of taking it and being able to put it to use. When my mother-in-law was a young girl it was actually a refrigerator in her kindergarten classroom that they had played with in the house area. I thought, since I was expecting, that it would be a neat piece for the babies nursery. I didn't know what I was having so I decided to paint it a neutral color, and then once I had her I found these adorable baskets to put inside of it to hold and keep all the necessities organized. I love it!!! I keep it downstairs for right now, but eventually it will make it up in her room. Have a great Friday!! ~Jessica

This is the before picture, hopefully you can see how I was drawn to this piece. It was a little rough looking, but with a few coats of paint you will see how it came together.
This is the after with the door attached. I might add a little bit more detail to the front now that I know it is going in a little girls room.

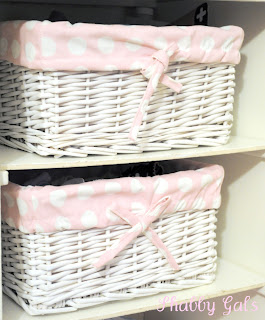
These are the adorable baskets that I found. They fit perfectly inside of it. I was really excited when I found them.

Linked to:
Pin It!

Thursday, February 23, 2012

A Sweet Little Rocker

It's Thursday. Found a darling little rocker at a garage sale.  It was a little sad looking and was missing a cushion, but I could see the potential it had and could see it in a little girls room or on a porch. So I took it home 
and took off the ugly pink pillowcase and found that I  had to make a new seat for it.  I first thought I would weave a seat but that didn't quite give me the look I wanted, so after the wood was cut to fit the seat, I found a pink sweater vest that had a crocheted front to.  Cut some foam and than covered the seat with the sweater.  It was a soft pink color.  Than I cut the lacey front of the vest and put in on an angle on each corner.  Before I added the seat, I added 3" wide pink ribbon that I softly pleated and added around the seat.  Painted the small round beads on the back of the rocking chair a soft pink.  Sanded the chair a little bit more to look more shabby.  I loved the look and it looked so girly.  I have already sold the chair after I put it in our Shabby Gals space and the lady that bought it said that she was a photographer and was going to use it in her photos.
Here is the after picture.....
Linking to these parties:
http://thebrambleberrycottage.blogspot.com/
www.theshabbycreekcottage.com
Pin It!

Monday, February 20, 2012

Happy Pillows

Happy Monday!  This weather has been just crazy around these parts....I think today reached maybe 45 degrees....it was BEAUTIFUL and SUNNY!  I keep thinking we are going to get slammed with winter.....and I'm hoping I am wrong.  Anyways, I have a simple pillow redo for you...although it took me awhile to complete these pillows due to the fact that I am very NOVICE sewer.  Here are my pillows before.  There was nothing wrong with them before...however, I just wanted brighter and happier pillows to decorate my couch.
I found my two coordinating fabrics at JoAnns and I'm pretty sure they were on sale.  Makes me chuckle saying that because my mother's voice always pops into my head saying, "NEVER buy anything full price...it almost always goes on sale!"  It's funny what types of parental advice sticks with you throughout the years.   I did see pillows similar to these in blogland...however, I do not have the source for you.  Sorry!  Here's the after picture....I love how they turned out and they really do make me smile! 
Linking to these great parties:

Pin It
Pin It!

Thursday, February 16, 2012

A Shabby Look for and Old Lampshade Form

Thank goodness it's Thursday.  A day closer to Friday and than the weekend starts and all the remakes begin......What fun....Found an old lampshade with the old wire in it and I began to tear all the old covering off that was discolored and torn.  The metal was in very good shape so I decided to paint the metal a pink color which I thought would lend itself to a Shabby look.  Check out the before picture.  Than I decided to wrap it with a shimmery cream netting and some cream ribbon.  I cut the netting into different lengths along with the ribbon and just knotted it where it ended and started.  I think it gave a really shabby look that lends itself nicely to an old vintage lamp that my husband rewired for me.  What do you think?  I think it is a fun look that is shabby and green at the same time...Talk about recycling.......Here is the after picture.......


Thanks for looking....Dianne.

Linking to these awesome parties:

                                                                       
Pin It!

Wednesday, February 15, 2012

One of a kind shelves

Good evening, I hope you had a great Wednesday. My life revolves around the baby these days so when my husband got home I had a moment to run upstairs to blog about my love for re-purposing pieces from old homes. Some think I am crazy, but if I could I would have a house filled with old trim, moldings, registers, shutters, and anything else that you can dig up from an old attic or barn that you can re-use in your house. Today I would like to show you how I took the old trim from around my husbands grandmothers windows, that had been stored in an attic for years, and used them as shelves. The best part is that they are so unique that you would never be able to find them in any stores around! I am always looking for pieces like this at flea markets and old barn sales so you can only imagine how excited I was when I came across these. My father-in-law thinks that I am crazy...but hopefully you find them as charming as I do. :)

This is a picture of only one so that you can really see what it looks like close up. I didn't even have to paint it, I loved the rustic charm.
This is the picture of how they are hanging on my wall. I have two of them kind of staggered as you can see. I forgot to mention that I have old iron fireplace grates, that I found at a flea market, sitting on the shelves. I thought that they would look neat as wall art when I happened to find them. If you keep your eyes open I have noticed that there are always treasures waiting to be found.
Jessica


Linked up to:

Pin It!

Monday, February 13, 2012

Bringing Life Into An Old Frame

Good morning and happy Monday!  I hope everyone had a good weekend.  They always go so fast don't they?  We finally got some snow around these parts....so we enjoyed a little sledding fun on Sunday afternoon.  Good times as my three year old giggled the whole time...best sound in the world!  Anyways....I have a frame up-cycle project for you today.  I found this frame at a flea market for a mere $0.50.  I liked the bulkiness and the size of the frame.  Here's the before picture....
I gave it a coat of primer and then added two coats of semi-gloss paint.  I chose a fantastic shade of aqua and then distressed it.  Then, I took a piece of material and adhered it to the back of the frame.  This frame did not have glass and I wanted to be able to display a picture.  I glued a white clip to the front of the material so you can change your pictures easily and frequently.  Here's the after picture.
I also think it could be cute with a fun quote!  Do you like it?

Linking to these fun parties:
http://www.skiptomylou.org/
http://www.thesoutherninstitute.com/ 
http://sewchatty.blogspot.com/
http://www.pinkapotamus.blogspot.com/ 

http://www.creatingreallyawesomefreethings.com/
http://sumossweetstuff.blogspot.com/
http://brassyapple.blogspot.com/
http://jambellish.blogspot.com/
http://thegirlcreative.blogspot.com/
http://diyhshp.blogspot.com/
http://www.notjustahousewife.net/
http://polkadotsonparade.blogspot.com
http://www.domestically-speaking.com/
http://www.gingersnapcrafts.com
http://www.craftskeepmesane.blogspot.com/ 
http://sewcando.blogspot.com/ 
http://linesacrossmyface.blogspot.com/ 
http://www.create-with-joy.com/
http://typeadecorating.blogspot.com/
http://sugarbeecrafts.com
http://creatingahouseofgrace.blogspot.com/ 
http://blackberryvine.blogspot.com/ 
http://www.jaqsstudio.com/
http://becolorful.typepad.com
http://houseinroses.blogspot.com/
http://delectablehome.blogspot.com/
http://crayonfreckles.blogspot.com/
Pin It!

Friday, February 10, 2012

Brand New Toy Box


Happy Friday!!  The weekend is here and the toy box is now finshed.  This is the look before. 


My daughter was so excited to have a new toy box, and I was so excited to have something that fits all those toys.  I sanded, wood filled and sanded again.  It is not perfect, but somehow I think all the imperfections make it look a little vintage or something to that sort.  After I sanded I put two coats of primer on and then painted another two coats of an aqua color.  I was going to leave it but thought it was a little too bright.  So I took some white paint and put a tiny bit on the brush and I guess slightly white washed it.  I do like how it toned down the aqua and shows some of cracks and dings on the trunk.  Now for the big reveal......


I hope you like it. I think I like it because it stores all the junk I mean toys.  Makes picking up a little easier when everything has a place.  Have a great weekend!
Until next time...Kim

Linking to:
Pin It!

Wednesday, February 8, 2012

The newest addition to shabby gals

Hi!  I just want to start by introducing the newest addition to the shabby gals family.  Just recently my baby girl decided to enter this world five weeks early.  She was born at a whopping 5lbs. 13oz.!!  Fortunately, she is a happy, healthy, little girl who also has a strong set of lungs, for as early as she decided to arrive.  So....it's been awhile since I've posted due to my new arrival.  I do have a fun project to show you today.  Since I love ALL things girly, I think every little girl needs a frilly, pink tutu.  I am going to share with you how I made a tutu.  I haven't been out of the house in what feels like a LONG time...so the best part of this project is there are very little materials needed and I had all of them at home!!

Step one: 

Gather your materials.  I used:  tulle(not quite sure how much I had...didn't need too much considering the size of the tutu that I had to make), ribbon (anything will work...I actually used the ribbon off of a bouquet of flowers that were brought to the hospital by some friends after I had her) and scissors.


Step two:

Begin cutting strips in the tulle (you can make the strips as wide as you would like, I did mine approximately 2in. wide). The length of each strip is also up to you. Just keep in mind that the actually length will be the strip folded in half.


Step 3:
After the strips are cut out (you can start with a few and cut them out according to how many you think you will need) begin by tying each strip of tulle onto the ribbon. Tie each piece on in the middle so that you get a double thickness of tulle.

This is after tying about 10 strips on...continue until you get the desired width of the skirt that you need for you little one.
Step 4:
Put it on your baby...or toddler, and take pictures. :)


I think that the best part of making the tutu is taking pictures of your little one that you can cherish for years to come. Enjoy!!
Jessica

Linked to:
Pin It!

Monday, February 6, 2012

Magazine/Book Table

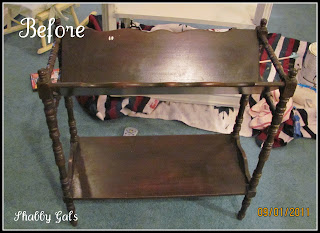
Happy Monday!  Hope everyone had a good weekend!  I'm a little tired this morning from staying up late watching the big Superbowl game.  What a fun game to watch and it doesn't hurt that my team won!  I found this magazine/book table through craigslist awhile back.  I'm not sure if this is the correct name for this piece of furniture.  Anyways here's the before picture....
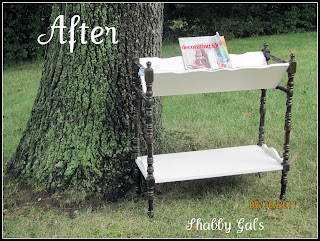
There was nothing wrong with it, just a few paint marks on the top.  I really like the look of furniture that has both painted and non-painted surfaces.  I gave this piece a light sanding on those surfaces I was going to paint and then primed them with Kilz.  I then chose to paint with a very soft shade of pink, which almost looks cream, on the top and bottom of the table.  I then sealed it with polyacrylic to protect the painted surface.  Here's the after picture....The picture quality isn't that great...sorry.  It's hard to really even see the color.
Have a great Monday!!
Jackie

Linking up to these parties:

http://www.skiptomylou.org/
http://www.thesoutherninstitute.com/
http://sewchatty.blogspot.com/
http://www.pinkapotamus.blogspot.com/

http://www.creatingreallyawesomefreethings.com/
http://sumossweetstuff.blogspot.com/
http://brassyapple.blogspot.com/
http://jambellish.blogspot.com/
http://thegirlcreative.blogspot.com/
http://diyhshp.blogspot.com/
http://www.notjustahousewife.net/
http://polkadotsonparade.blogspot.com
http://www.domestically-speaking.com/
http://www.gingersnapcrafts.com
http://www.craftskeepmesane.blogspot.com/
http://sewcando.blogspot.com/
http://linesacrossmyface.blogspot.com/
http://www.create-with-joy.com/
http://typeadecorating.blogspot.com/
http://sugarbeecrafts.com
http://creatingahouseofgrace.blogspot.com/
http://blackberryvine.blogspot.com/
http://www.jaqsstudio.com/
Pin It!

Saturday, February 4, 2012

Valentine Heart

So I have a real quick project, it's nothing fancy.  I like to have a little something around my house to celebrate the big Valentines Day!  If not for me, but for my little girl who loves making valentines.


So all I did was take a wire hanger and manipulate to a heart shape.  I had bought this glittery strand of garland from JoAnn's after Christmas for about one dollar and wrapped it around it.  Simple, but I think it turned out pretty fun looking. 

Until next time....Kim

Linking up to:


Be Different Act Normal

Pin It!

Friday, February 3, 2012

Shutter Love

Happy Friday!!  I found these shutters at a local estate sale.  I love shutters and all the different ways that you can use them!  I have seen them used as memo boards, headboards, shelves, and even magazine racks.  Here is a before picture of my shutters.
I gave it a good cleaning and then sprayed it with Krylon's "Ivy" spray paint.  I chose not to distress the shutters.  I wanted to display them on my mantel as I've seen others do.  I added a valentine banner and a love sign.  It will be fun to change out the decor as the seasons change.  Here's my after picture!
Enjoy your weekend!
Thanks for visiting!
Jackie

Linking up to:

monogram


One Artsy Mama


five days five ways | feature friday free for all

Fancy This


http://funtocraft.blogspot.com/
http://thecreativepaige.com
http://candacecreations.blogspot.com/
http://www.karismaheartsavannah.blogspot.com/
http://astrollthrulife.blogspot.com/
Pin It!

Thursday, February 2, 2012

A New Look for A Little Ottoman

Its Thursday and I have a little remake.  The little ottoman looked so sad and didn't match anything in the room.  It needed a little tlc.....So I got busy and found some material that would look nice with my yellow stripe chair that I had in my family room.  So here is the before.....
Here is the after and it looks like it belongs to the room and the chair.  The material also helps to hide dirty feet marks and my little grandchildren who like to climb all over it........See you next Thursday with another little makeover......Dianne
Pin It!

Wednesday, February 1, 2012

Cheese Dome to New Cloche

Happy Wednesday!! I have a small little project for you tonight. I have actually seen this project on several different blogs, however, I cannot remember the blog names. Sorry....Anyways, I found this cheese dome (is this what their called?) at a garage sale this past fall. Here is the before picture...
I simply gave it a good swipe with a good 'ole Clorox wipe and sprayed with Krylon's Green Ivy paint.  I put a few pumpkins, leaves, and etc. in it during the fall months and then put various Christmas bulbs in it during December.  Here's an after picture of it.....I like the way it turned out and it's fun to always change out the items and get creative with it!  I have also seen these cloches glued on top of a chunky candlestick.  They are super cute that way too!
Have a great evening!!
Jackie

Linking up to:


http://thetrendytreehouse.blogspot.com/
http://www.bluecricketdesign.net/
Pin It!